Site A-Z Feature Live

Understanding that Blogger's Blog Archive feature is not the easiest navigation tool to find older posts, for example if you want to find a specific post but can't remember or don't know when it was posted, I wanted to implement something a little more user friendly.

The result is a new page, Site A-Z, containing a simple alphabetised list of all posts made on the blog. Each time I add a new post it will be added to the list.

There is a permanent link to the Site A-Z at the top of every page, which I have highlighted in the image below.


Őszi színek BMW és Styling 45 -ös

Nincs mit tenni, jön az ősz vége, és ezzel a tél. Ha tél akkor téligumi, meg elvileg acél. Na most nálam az első stimmel a második nem. A gumi az echte téli, mégpedig nem más mint a 2011-ben első, míg a 2012-es tesztben a kategóriájában 2. helyen végző Michelin Alpin A4. (Amúgy nem sokkal maradt le az első Continentaltól.)


Még hozzá kell szoknom. A Styling 160 után egy kicsit egyszerűnek tűnik a Styling 45-ös.

Nekem szimpatikus volt a gumi, meg maga a gyártó is az. Fater közel 12 éves Michelin gumija még mind a mai napig jó, az még az ősidőkből való Alpin - xxx mittudoménmi, de még mindig viszonylag jó. Persze BMW-re nem tenném fel, de azért mutatja, hogy egész jól bírta (pl.: Ő terepen megy, de nem szakadt szál, nem volt durrdefekt, stb. + a kopást is jól bírja!)

Mivel a felni gyári BMW Styling 45 -ös, melyre a kezelési kézikönyv (télinek is) 205/55 R16 91 Q/T/H-t ír, vagy 225/50 R16 92 Q/T/H-t, így sok választás nem volt, muszáj volt vennem valamelyiket. Én a keskenyebb mellett döntöttem. Bár tény, eredendően benéztem mivel azt hittem, hogy 16-osra a 195-ös is felmegy, de gyári adatok szerint nem. Én pedig gyári elv szerint szeretek élni ekként kivártam a megfelelő alkalmat és lecsaptam 4 db 2012-es Michelin Alpin A4 91T gumira. Darabonként bruttó 27.975 volt. Ehhez 4  x 990 szállítás = bruttó 115.860 Ft. A Marosi Gumitól rendeltem. Én csak ajánlani tudom. Olcsó, gyors és tényleg friss gumijai vannak, az enyémek pl.: 2012 II. féléviek.  (http://www.marosigumi.hu/)


A 12 kg-os Styling 160-as után a 10,0 kg-os Styling 45-ös sokkal könnyebbnek tűnik. Mármint levétel és feltétel közben :-) 

Összességében:

Az összhatás nekem még egy kicsit furcsa. A vastag küllők miatt egy kicsit X5-ös érzésem van, eltűnt a kecsesség melyet a 17-es alu sugárzott.
Amúgy a 16-os Styling 45-ös a Styling 44 -es, de 17-es tesójával az egyik, ha nem a legnépszerűbb E46 alufelni.

Propshaft Centre Bearing Replaced

An unsettling juddering and squeaking started occurring when accelerating and decelerating, usually in 2nd and 3rd gear but not exclusively, and usually between 1.5k and 2.5k revs, also not exclusively.

The judder felt like a rotational wobble of something emanating from underneath the glovebox/rear of the console. The squeak also sounded like it was coming from this area.

The juddering was more on acceleration, and the squeaking more on deceleration. There was no loss of power, and the clutch wasn't slipping.

I did a bit of research and found it was most likely the 'guibo' (flexible disc on the propshaft), but there was a small chance it could be the centre baring on the propshaft also.

Armed with some research I got the car on the ramps and started investigating. The guibo looked completely fine, so puzzled I decided to delve deeper and remove all trim panels and the exhaust from the downpipe back.

It was fair to say I'd found the problem when I saw what's in the video below. The rubber boot in the centre bearing mount had completely disintegrated, providing no support at all to the propshaft. You can see my dad wobbling the propshaft, whilst he's doing so you can see straight through the gap where the rubber boot should be.


Unfortunately I needed the parts quickly as the car had to be on the road, so had to get the parts direct from BMW at what would most likely be an extortionate price.

I called up and got a quote, £92.15, that included the following all genuine BMW parts;

6x - p/n: 26117527475 - Description: Hex Bolt - M12 x 1.5 x 71 - ZNS3
6x - p/n: 07129900047 - Description: Self-locking hex nut - M12 x 1.5 - 10 - PHR
1x - p/n: 26122282496 - Description: Aluminium Centre Mount, with Grooved ball bearing - D=55/D=35
1x - p/n: 26127511140 - Description: Butyl cord Terostat 2460 - 190mm x 20mm x 8mm
6x - p/n: 33217571990 - Description: Torx screw with ribs M10 x 46 - ZNS3

A lot of the bolts in this area are one use only and I wasn't sure how many I would have to remove to do the job, so just bought a replacement for all of them for peace of mind that the job was well done.


All parts assembled I got straight to work, first job being to crack the nut joining both halves of the propshaft. This turned out to be easier said than done, a rather large spanner extension and some choice French words later it was removed. Three bolts hold the front section of the propshaft to the flexi disc, after removing these it could be removed from the car. Before removing it I marked it at both ends with white paint to make sure it went back in the same orientation, quite important for balancing reasons I believe.


Now the propshaft was separated the shot centre bearing could be removed. The bearing came away fairly easily and so did the rest of the assembly. Quite a lot of the butyl cord was left stuck to the chassis and as I had bought a replacement strip I cleaned all the old stuff off. It's horrible stuff that sticks to everything, so it took a little while to clean it up.

All cleaned I prepared the new bearing for fitting, applying the new butyl cord strip to the mounting bracket. It was also a chance to compare new with old to show how bad the old one was.


Everything now prepared, reassembly could begin. The remaining half of the propshaft had been supported by a length of strong wire, whilst suspended and with the brown packaging film on the butyl cord still fitted, the centre bearing was pushed into place.


Next the removed portion of the propshaft was refitted.


Propshaft back together, all the other nuts and bolts were replaced with fresh ones, and finally the rest of the car assembled.


Touch wood, since the work was carried out there has been no judder or squeaks, so hopefully it was caught just at the right time and work was done correctly.


M-Tec Gear Knob and Leather Gaiters

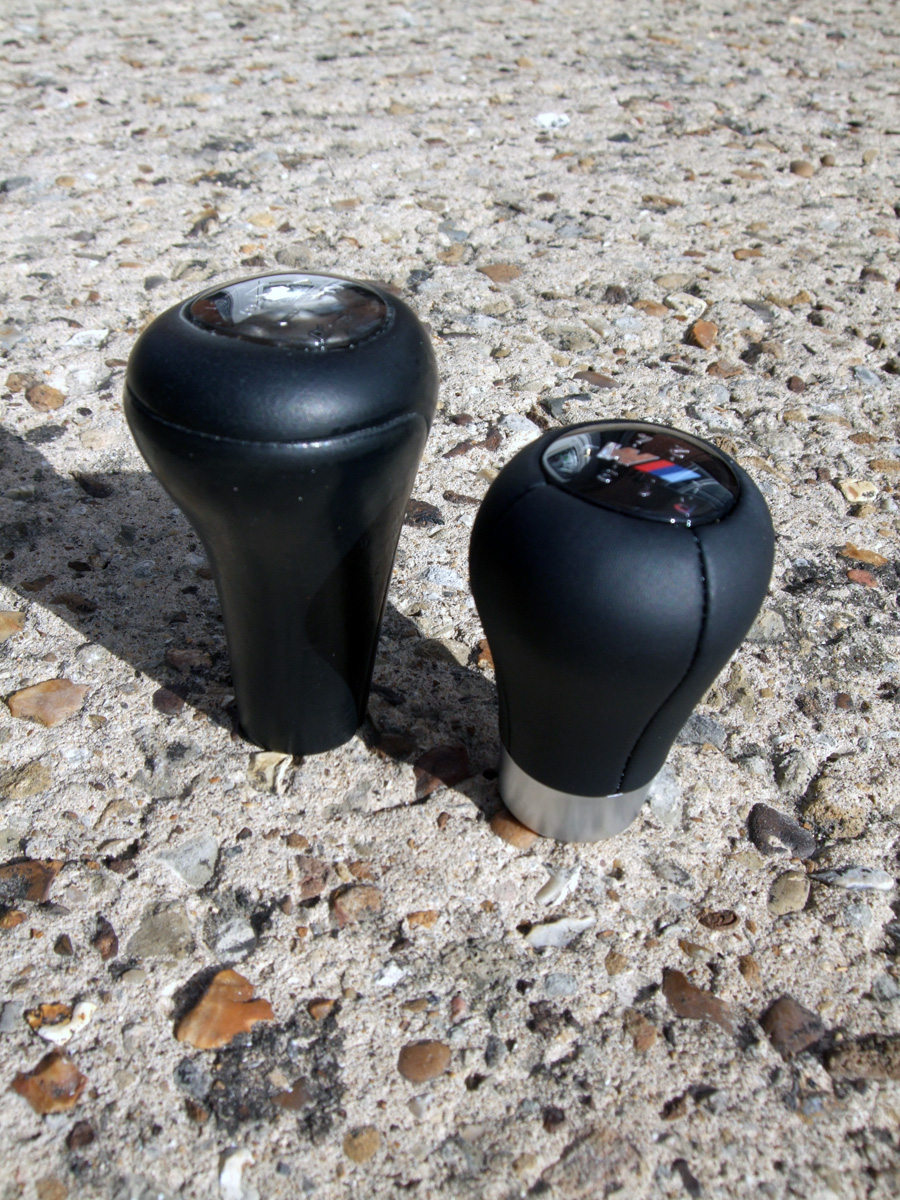
The original gear knob was looking extremely tired; leather worn, numbering sticker peeling and just plain boring. The gaiters weren't much better either, the leather now high gloss instead of matt, and cracking in all the usual places.

I started off looking at Alcantara gaiters to match the seats, but whilst searching eBay for inspiration found a perforated leather option too. I asked the seller, TopGaiters, for a bit more info and maybe a larger picture of both, just so I could decide if I liked either option. They were kind enough to send out two samples of both materials for free.

The sample settled it pretty quickly, the perforated leather had a much more premium feeling, and would lift the interior considerably. I decided on a light grey stitch, as I thought black would just blend in and any other colour would look out of place amongst the monochromatic surroundings.

At £29.99 for the gear gaiter and park brake gaiter they weren't cheap, but I was confident they would be worth it.

The gear gaiter was first to be swapped, as I was changing the gear surround trim at the same time for the carbon wrapped trim I had previously prepared. You can see my post about carbon wrapping the gear surround here -


Squeezing and lifting the gear gaiter reveals two screws securing the gear surround trim down. I removed those then removed the gear knob. A firm pull removes the gear knob, it's pretty tight on the gear stick so I had prepared myself for a bit of a struggle. (I'd read some rather comedic stories of people giving themselves black eyes whilst removing it.)


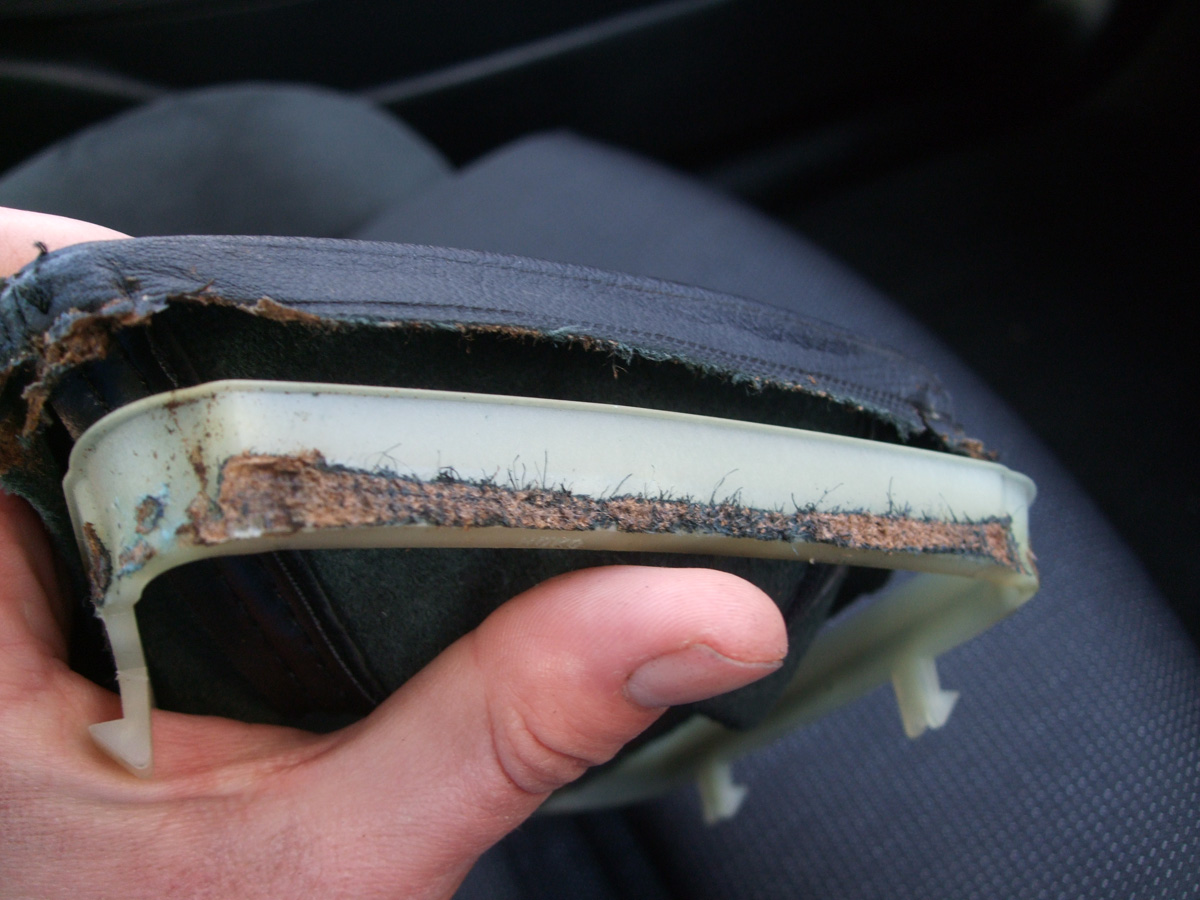
With the gear knob removed the gaiter simply slid off. The new gaiters don't come with the plastic substrate so a bit of salvaging had to be done on the old one. The old leather was very brittle and snapped in places, so it took a little bit of scraping to get all glue residue and leather fragments off the substrate before fitting it to the new one.


With the old gaiter removed from the substrate I put the two next to each other just to compare out of interest.


To help secure the plastic substrate to the new gear gaiter I used some Bostik Evo-stik Impact contact adhesive around it's periphery.


After 10 years of use understandably there had been a lot of dust and crumbs fall underneath the gear surround trim, so before refitting I did a thorough vacuum of the area.


All cleaned I started reassembly, firstly by installing the new carbon wrapped gear surround trim, then the gaiter and finally the new gear knob. To read more about the carbon wrapped trim, take a look at this blog post - Carbon Wrapped - Gear Shift Surround.


My darling girlfriend bought me a shiny new M-Tec sport gear knob, a much smaller smooth leather wrapped gear knob with a chrome bezel. Much more premium and sporty, I believe it was a cost option at purchase and one I would definitely have picked.


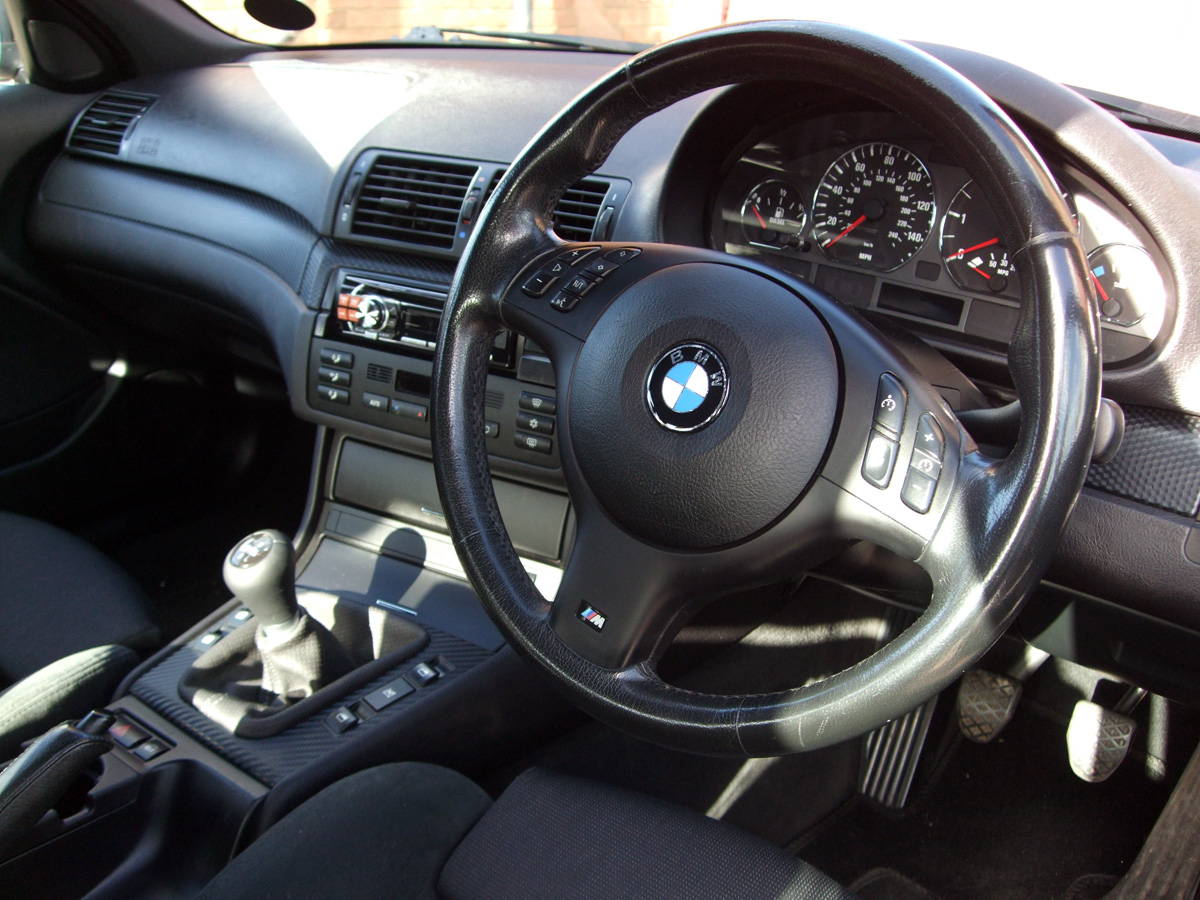
All back together the gear shift area looks superb, far more premium, new, and much sportier.

Before (left) and After (right)


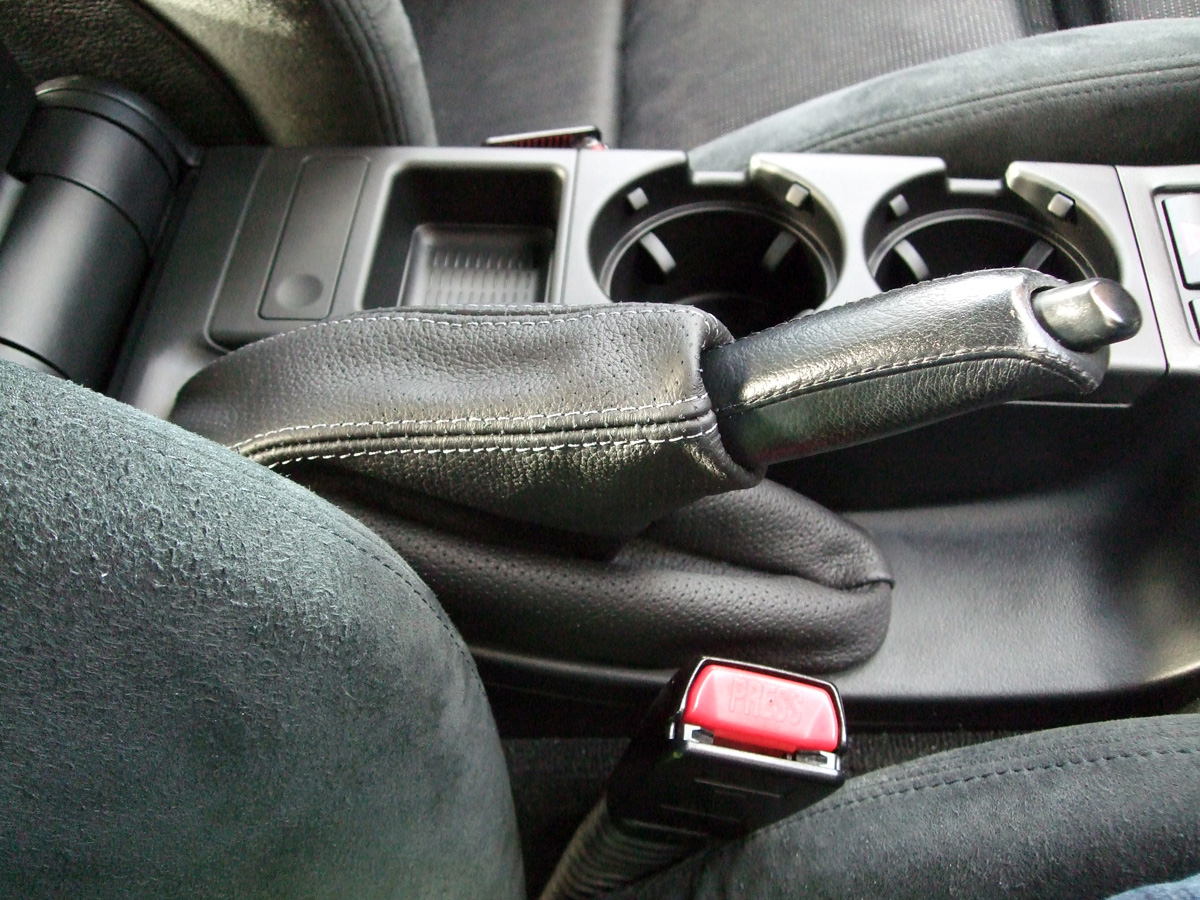
Now the gear shift area was all done, I could start on the park brake (handbrake) gaiter. Squeezing the base of the gaiter and a bit of pulling unclipped the gaiter from the console. Pulling it inside out revealed the cable tie holding it in place. Some cable cutters took care of the cable tie, releasing it from the handle. As with the gear gaiter, the plastic frame substrate had to be salvaged and glued in place.


Comparing the old and new gaiters.


Again I used Evo-stik to secure the gaiter to the plastic frame, then set about fitting it. This was slightly more tricky than the gear gaiter, as the new gaiters were such good quality materials, i.e. thicker, they didn't want to fit in the same size aperture in the console. With a bit of fiddling eventually it went in and the job was finished.


It actually fits a lot more snugly to the handle than it shows in the picture, nevertheless I am very happy with the results. The console looks much fresher, extremely worthwhile upgrade and refresh of the interior. The gear knob fits positively in the hand, and feels more direct when changing gears, they are expensive for what they are but I couldn't recommend one highly enough.

Here are the finished shots and a couple of before and afters.

Before (left) and After (right)


sarah lous textiles Proudly Powered by Blogger