Side Repeaters Replaced

The side repeaters were looking quite sorry for themselves, all misted over and generally just old looking.

I originally ordered a new set from aceparts.com with my LED Sidelights and Xenon Fog Lights. They were just copies of the OEM style in clear plastic.

When they arrived, I was less than pleased. The quality of the lights was absolutely awful. Immediately evident was poor quality of the part mould, as there was flash the whole way around the part. For those not in the know, this is when the mould doesn't close properly and material can escape.


Persevering, I spent some time with a scalpel trying to neaten up the edges, then went to test fit only to find that the bulb housing did not fit into the light at all. Out came the scalpel and yet more removal of material.


After much frustration, I finally managed to get everything to fit where it should, time to fit it to the car. Well, you can see the results below, it's not exactly a perfect fit. Needless to say they got sent back to aceparts.com for a refund. Extremely poor.


After this disappointment, I decided it was best to go for OEM quality parts. So I ordered a set from eurocarparts.com. These looked much more promising, far higher quality and came with bulb housings and bulbs.


With the old ones removed I compared them against the new ones, only then was it clear just how bad the old ones actually were.

old vs new e46 side repeater

Last thing to do was to fit them, thankfully they fit superbly. They have really freshened up the front quarter panels, and even after all the hassle it was a worthwhile exercise.

Before (left) and After (right)

weathered e46 side repeaternew e46 side repeater

new e46 side repeater


Dash Trim Fixings Replaced

My instrument panel (dash board) mid finisher trims around the head unit had worked it's way loose of late, causing a seriously annoying rattle. It eventually got to the point where the passenger side trim at the inboard end was actually coming away from the dash.

I decided, to save my sanity, to remove the trims for the time being to see what the problem was and whilst I found a fix.

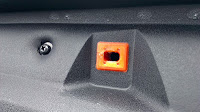
Upon removing the trims, it was immediately evident time and condition changes had taken their toll on the plastic fixings that hold the trims in place. They had completely discoloured and every one had cracked or split. The one at the inboard edge had completely fell to pieces, and just fell out when I took the trim off.

broken e46 trim fixingbroken e46 trim fixings


I called up BMW and got 5 replacement fixings sent out, only cost 44p each which was a bonus.

e46 trim fixings

Offering up the trim fixings against the old ones, it was clear just how aged the old ones were.

broken e46 trim fixings

It took a bit of fiddling to work out how to get these fixings out, turns out they require a quarter turn clockwise then a firm pull upwards at an angle. And the opposite to fit the new ones.

Once all five fixings were replaced I refitted both trim panels and all was good as new. The new fixings hold the trims extremely solidly, and thankfully no sanity testing rattles.

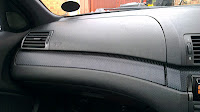
e46 dash consolee46 passenger dash trim


Chrome Dial Rings and Red Needles

After a rather long hiatus in updates on the car, I decided to start small. The dials and general clock area wasn't the most exciting part of the car as standard, and as you spend quite a lot of time looking in this area, I decided it needed a bit of a facelift.

Having installed chrome dial rings on my old car and seeing the difference it made, I thought that would be a great start.

I ordered the kit from eBay for the bargain price of £13.79 delivered. They are great quality and fitting was very simple too. No glue required at all, just clip them into the housing and off you go.

Here's the pictures of just the chrome rings installed, apologies for the poor after picture.

Before (left) and After (right)

standard e46 diesel instrument clustere46 chrome dial rings


As you can see, already it is much improved, adding to the premium feel of the car.

Next I decided to add a bit of colour, you might have read about this mod nick named "the Sharpie mod". Basically it involves using a marker pen to recolour the instrument needles red (or a colour of your choice). I believe the M3 came with factory red needles, could be wrong though.

After searching everywhere for a chisel tip red Sharpie I gave up and just bought a chisel tip Pentel permanent marker for £1.39 from Rymans.

Weapon of choice

pentel red chisel marker

Taking the instrument cluster back out again, I carefully disassembled it to reveal the dials and needles.

e46 instrument cluster removed

e46 instrument cluster dials exposed

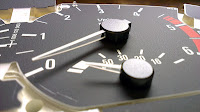
Once exposed I took a good look at the needles and discovered they were different to how I imagined, and this actually made the job easier. I originally though I'd have to colour the sides of the needles as well as the top face. Turns out the top face is the only white bit, the sides are transparent. 

e46 dial needles close up


So only needing to colour the top, I placed some paper towel carefully under the needle so if I missed I didn't ruin my expensive instrument cluster. Then tentatively set to work colouring in.


The process is actually fairly forgiving, and I was quickly done. However, with the larger needles I wasn't overly happy with the finish, so I re-coated those which was a bit of a faff to be honest. Nevertheless I got them all to a standard I was happy with and reassembled.


For some reason my camera makes the red look overly vibrant, in reality it is slightly less saturated.

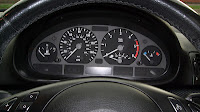
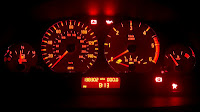
And finally here is the instrument cluster reinstalled in the car, a massive improvement in my opinion. It also looks great at night, with no light loss, and even better at dawn. A very worthwhile mod in my opinion.

e46 chrome dial rings red needlese46 dashboard interior

Night shots 

e46 dials illuminatede46 dial illuminated

Dawn shots


A fogyasztásról általában - BMW E46 N42B20A 1995cc 346L Touring

Íme a statisztika:
(Egyes tankolások után a beletöltött benzin és a megtett kilométerekből számolva. Nem BC, meg társai, hanem a konkrét papírforma szerint! Résztankolások nem számolva.)

Menet közben, rögtön elindulás után. Olaj jeladó hibás. Az egyetlen hibakód az autóban. Az éppen megtett kilométer száma: 578,9 => közeleg a tankolás pillanata!


  1. alkalom: 9,7 liter (első út ismerkedés)
  2. alkalom: 9,3 liter
  3. alkalom: 9,8 liter
  4. alkalom: 9,3 liter
  5. alkalom: 9,02 liter
  6. alkalom: 8,45 liter (csak autópálya, eddigi max Reichweite: 605km 51,14 liter bengából)
  7. alkalom: 9,08 liter (csak 98'-assal)
Megjegyzés:
  • 225/45 ZR 17 papucsok
  • elég sportos vezetés :-)
  • általában 2 fő terheléssel
  • vegyesen használva városban (Veszprém - Székesfehérvár) és lakott területen kívül
  • egészen a legutolsóig 95-össel tankolva
A statisztikákból mindenki vonjon le azt amit akar. Nekem egy a lényeg: az élvezet! 
Mondjuk a közel 2000-es fenevadat széles papucsokkal, és nem lassan közlekedve nem lehetett 10 liter fölé nyomni!

sarah lous textiles Proudly Powered by Blogger